CRM and leads
The CRM module is where every new opportunity starts. You capture a lead, move it across a kanban pipeline as the conversation progresses, and convert it into a customer the moment the deal is won. Every stage change is written straight to the ERPNext engine, so the pipeline you see is the same pipeline your reports and dashboards read.
Open CRM from the sidebar or go to /crm. The pipeline, the lead form (/crm/new) and every lead profile (/crm/{id}) sit under the Run · CRM breadcrumb. Leads use the ERPNext numberingCRM-LEAD-2026-00001 when the engine is connected.
The sales pipeline
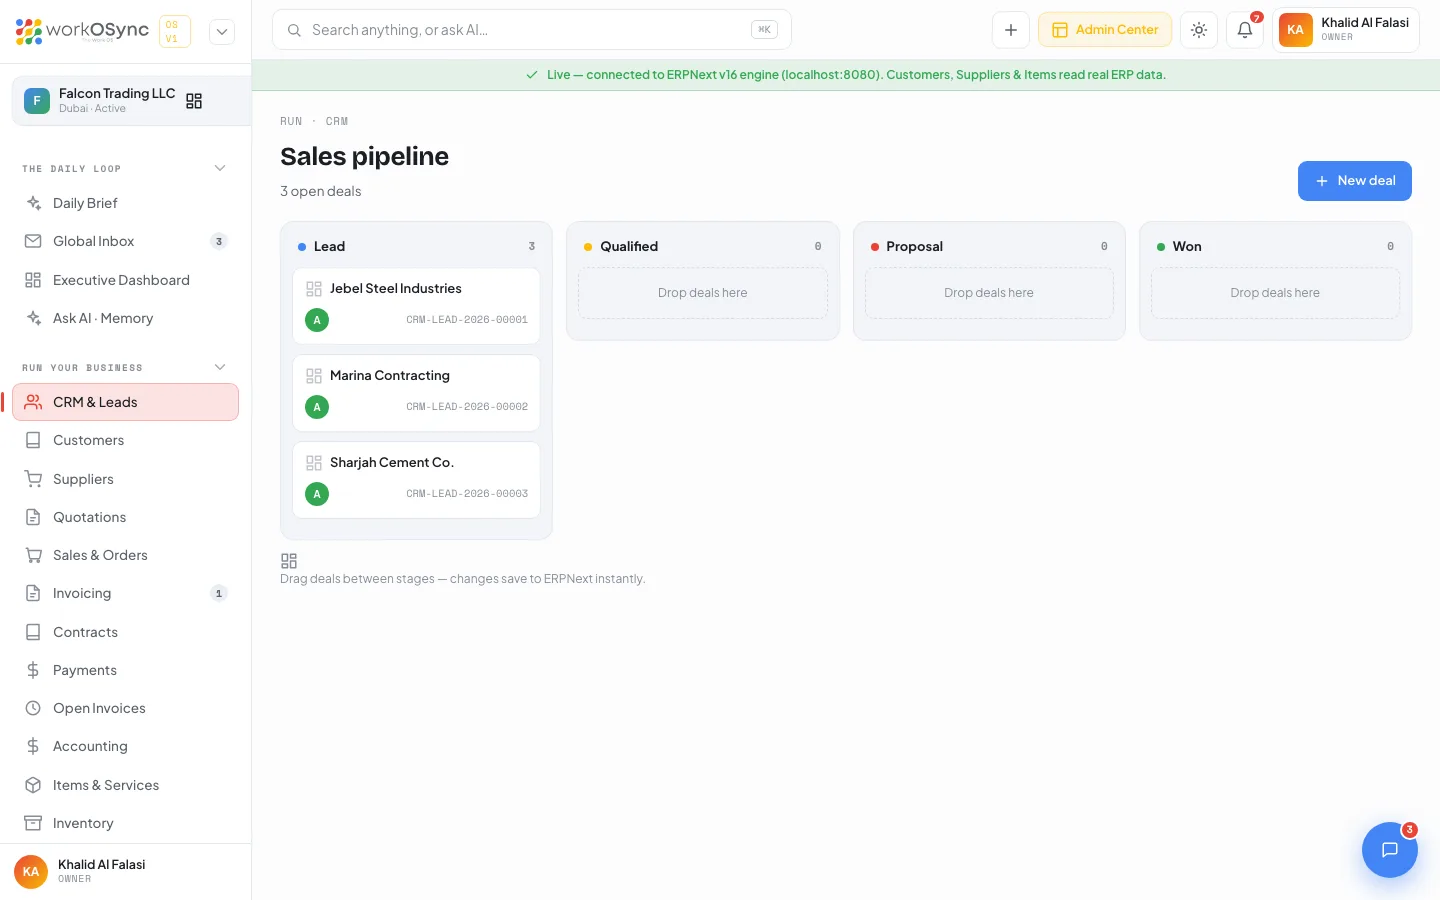
The pipeline page is titled Sales pipeline. Its subtitle summarises the board in one line: {n} open deals · AED X in play, where won deals are excluded from both the count and the value. The only header action is New deal, which opens the lead form.
Pipeline stages and ERPNext statuses
The board has four fixed columns. Each column is a WorkOSync stage that maps onto one or more ERPNext lead statuses, so a lead created or updated inside ERPNext lands in the right column automatically.
| Column | Colour | ERPNext lead statuses | Meaning |
|---|---|---|---|
| Lead | Blue | Lead, Open, Replied | A new contact you have not qualified yet. |
| Qualified | Yellow | Interested, Opportunity | The lead has a real need and budget; it is worth pursuing. |
| Proposal | Red | Quotation | A quotation has been prepared or sent. |
| Won | Green | Converted | The deal closed and the lead became a customer. |
Deal cards
Every lead is a card. From left to right and top to bottom a card shows:
- A drag grip on the left edge.
- The company name, which links to the lead profile.
- The deal value, shown only when it is greater than zero.
- An owner avatar for the person the lead is assigned to.
- A lead ID tag, for example
CRM-LEAD-2026-00001.
An empty column shows the prompt Drop deals here. The footer of the board reminds you that Drag deals between stages - changes save to ERPNext instantly.
Moving a deal between stages
- Pick up the card
Press and hold the drag grip, or anywhere on the card, and drag it towards the column you want.
- Drop it in the new column
The card moves immediately so the board never feels slow. WorkOSync then writes the matching ERPNext status in the background.
- Watch for a rollback
If the save fails (for example the engine is unreachable), the card moves back to its previous column and an error is shown. Nothing is left half-saved.
When the ERPNext engine is connected, the card value comes from the lead value stored on the lead (it shows as 0 until one is set) and the owner is the ERPNext lead owner, or Unassigned when there is none. The board has no filters or search of its own; use global search to jump to a specific lead.
Add a lead
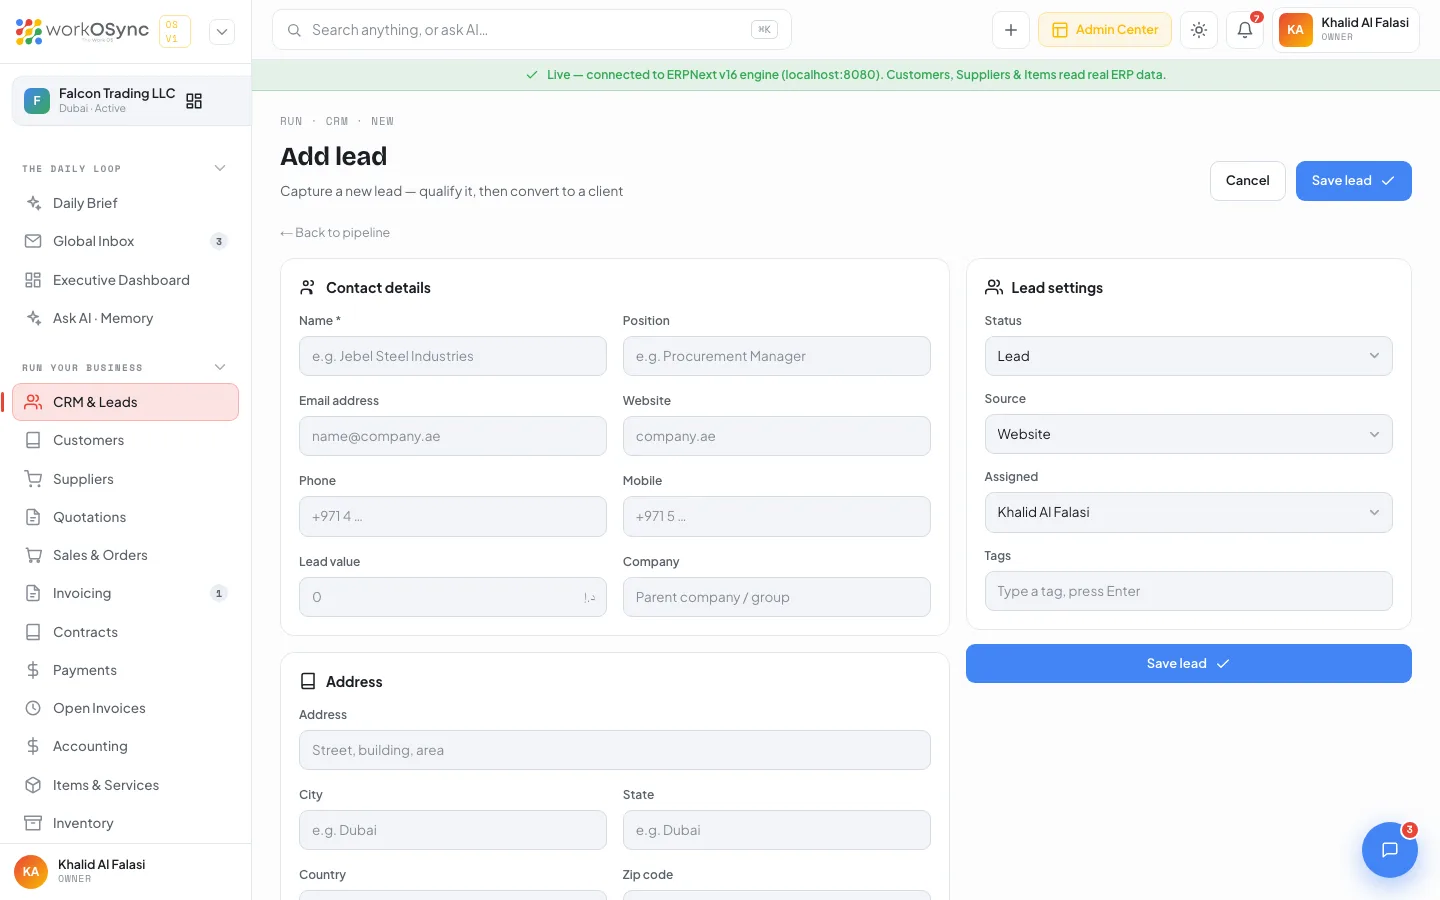
Choose New deal on the pipeline, or go to /crm/new. The page is titled Add lead with the subtitle Capture a new lead - qualify it, then convert to a client. The header carries Cancel and Save lead, plus a ← Back to pipeline link.
Contact details
| Field | Notes |
|---|---|
| Name (required) | The company or person. Placeholder: e.g. Jebel Steel Industries. |
| Position | Job title of your contact. |
| Email address | Primary email for the lead. |
| Website | Company website. |
| Phone | Landline. |
| Mobile | Mobile number. |
| Lead value | Expected deal value. Shows on the card when greater than zero. |
| Company | Parent company or group, if the lead belongs to one. |
Address
| Field | Default and options |
|---|---|
| Address | Street address. |
| City | Free text. |
| State | Free text (emirate, state or province). |
| Country | Defaults to UAE. Options: GCC countries, India, Pakistan, UK, US, Other. |
| Zip code | Postal code, if any. |
More
| Field | Default and options |
|---|---|
| Default language | English, Arabic, Urdu, Hindi or French. |
| Description | Free-text notes about the opportunity. |
| Public | Checkbox. |
| Contacted today | Checkbox to record that first contact happened on the day you saved the lead. |
Lead settings sidebar
| Field | Default and options |
|---|---|
| Status | Defaults to Lead. Options: Lead, Qualified, Interested, Converted, Do Not Contact. |
| Source | Defaults to Website. Options: Google, Referral, Elsewhere, Website, Social, Email, Other. |
| Assigned | Pick a team member (for example Khalid Al Falasi, Rania Aziz or Aisha Rahman). |
| Tags | Type a tag and press Enter or a comma to add it as a chip. |
The sidebar ends with a full-width Save lead button. If you save without a name the form shows Name is required. On success you are taken to the new lead's profile. In demo mode a yellow banner reads Demo mode - connect the engine to save leads and saving returns ERPNext engine not connected (demo mode).
The lead record stores name, email, phone, mobile, website, city, state, country, position, status and lead value. The Company field, when filled, becomes the ERPNext lead name; otherwise the name is used. Source, assignee, street address, zip code, description, tags, language, and the Public and Contacted today flags are kept on the form for now and are not written to the lead. If one of those fields matters to your process, note it in the Description or in Notes.
The lead profile
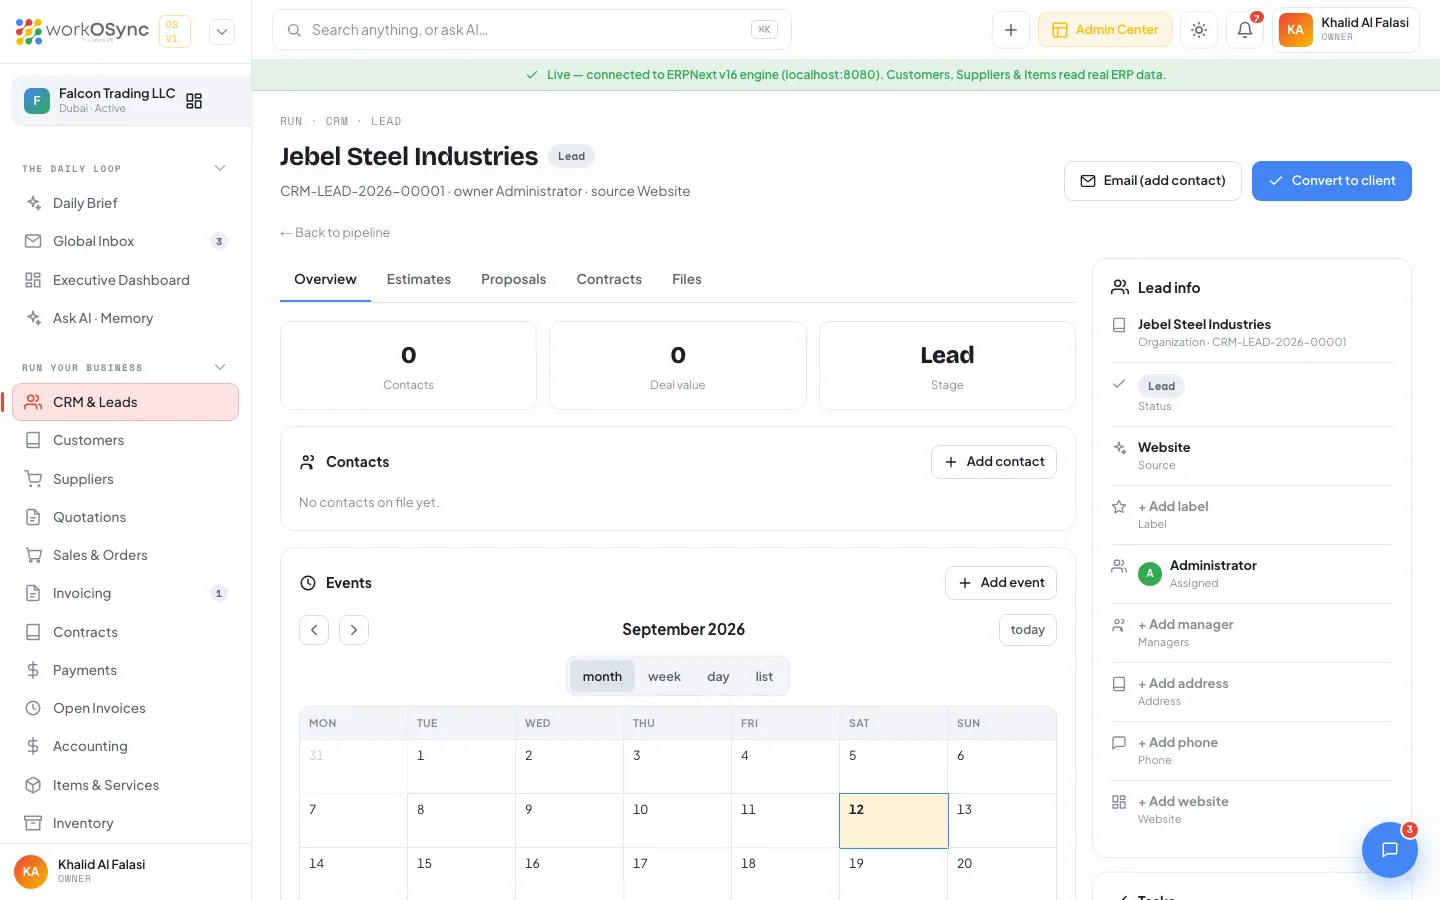
Click any card name to open the lead. The breadcrumb reads Run · CRM · {stage}, the title is the company name with a stage badge, and the subtitle shows {id} · owner {owner} · source {source}.
Header actions
- Convert to client creates an ERPNext Customer from the lead and opens its profile. See the steps below.
- Email opens your mail client with a follow-up addressed to the lead's email, subject {company}: follow-up from Falcon Trading LLC. When the lead has no email on file the button reads Email (add contact) and switches to the Overview tab so you can add one first.
Tabs
| Tab | Contents |
|---|---|
| Overview | Three counters (Contacts, Deal value and Stage), a Contacts card that lists the primary contact plus anyone you add, and an Events calendar with month, week, day and list views and a today shortcut. |
| Estimates | Shows No estimates yet with a New estimate button that opens the estimate builder. |
| Proposals | Shows No proposals yet with a New proposal button (also the estimate builder). |
| Contracts | Shows No contracts yet with a New contract button that opens the contract form. |
| Files | A Files card with an Upload button. Uploaded file names, types and sizes are indexed in this workspace; the empty state reads No files yet. Upload contracts, IDs or supporting documents. |
Add contact and Add event
- Add contact opens a modal with Full name (required), Designation, Email and Phone. Save contact creates an ERPNext Contact linked to the lead when the engine is connected; in demo mode the contact is kept in this workspace and the message reads Contact {name} added (saved in this workspace). Saving without a name shows Contact name is required. Contacts you added carry a remove control; the primary contact is badged Primary.
- Add event (or clicking an empty day on the calendar) opens a modal with Title (required), Date and Time (default 10:00). Schedule creates an ERPNext Event with the lead as a participant when connected, or keeps it in this workspace in demo mode. Clicking a day that already has events switches the calendar to the day view.
Lead info sidebar
The right-hand Lead info panel lists Organization (with the lead ID), Status, Source, Label, Assigned (with the owner avatar), Managers, Lead value (only when greater than zero), Address, Phone and Website. Phone is a tap-to-call link when the lead has one. The + Add label, + Add manager, + Add address, + Add phone and + Add website prompts are click-to-edit fields: type a value, press Enter or the tick to save, and a gear icon lets you edit it again. These values are stored in the browser you use, not on the ERPNext lead. Two shortcuts sit at the bottom: Tasks: Add task opens Tasks and Notes: Add note opens Notes, so follow-ups live where the rest of your team can see them.
Convert a lead to a client
Conversion is the hand-off from CRM to the customer master. It is a single click, and the customer it creates is immediately available in quotations, sales orders and invoices.
- Open the lead
Click the card name on the pipeline, or use global search with the lead ID.
- Check the details
Make sure the company name is right. It is the one field that carries across: the customer is created as a Company in the Commercial group with the United Arab Emirates territory, and you add the contact details on the customer afterwards.
- Click Convert to client
WorkOSync creates an ERPNext Customer and opens its client 360 profile. The lead itself is not changed, so drag its card to Won (ERPNext status
Converted) to close it on the board. In demo mode the button shows Demo mode: connect the ERPNext engine to convert this lead into a customer record. - Complete the customer master
Add the TRN, currency and credit limit on the customer, then raise the first quotation or invoice.
Move a card to Proposal the day you send the quotation and to Won only after Convert to client has created the customer. The subtitle's "AED in play" figure then reflects genuine open business, and the Daily Brief on your dashboard reports the same number.
Related
- Customers: the master record a converted lead becomes.
- Quotations: the document you send at the Proposal stage.
- Navigating the app: quick create and global search shortcuts.